
Artwork Guidelines
How to Supply Artwork to us:
We can accept artwork files in the following formats:
- Adobe PDF (Press Quality Hi-Res)
- Adobe InDesign
- Adobe Illustrator
- Adobe Photoshop
- Microsoft Word – but see notes below
All artwork should be at a resolution of 300dpi minimum, with all colours in CMYK, fonts outlined, any other artwork is vector-based and a 3mm bleed on all sides is included.
If supplying a Word document which contains images in the file, please also supply the images separately & a hard copy proof of the artwork for checking against, as sometimes font and positioning can change – if this is not possible we will convert your Word file to a PDF and email you a proof to check prior to printing. If possible please save your Word file as a PDF prior to sending to us: File/Save As/PDF – most current versions of Word have this option as standard.
If print ready pdf artwork is not supplied and we have to alter/tweak/edit your file we will create a PDF proof of your design for you to check before we proceed to print.
CMYK/Spot Colour Information:
Your digital camera, scanner, monitor and computer use a combination of three colours: Red, Green and Blue (RGB) to create images; the printing process uses four colours to print these images: Cyan, Magenta, Yellow and Black commonly called CMYK or process colours. Therefore, at some stage during production all RGB images have to be converted to CMYK images.
This colour conversion should be done before the file is sent to us. If it is not done there is a danger that the standard RGB to CMYK conversion process we use may make some of the colours appear washed out or dull.
When choosing the colours for your job try to choose colours from the Pantone colour palette if your software has it. If the job you want is to be printed in process colours, make sure that your Pantone colours are converted to their CMYK equivalent before sending the file to us.
If your job is to be printed with a spot colour, check to ensure that you just have one version of that spot colour – some software packages have a CV or a CVC version of the same colour. An easy way to check this is to print separations on your printer; if you have more than the required number of sheets (i.e. two colours = two sheets) you have too many colours.
Image Resolution:
If you are scanning photos yourself save them as EPS or TIFF files because this will preserve the colour and clarity of your images. If you are scanning a previously printed item, e.g. a magazine photo, you will need to “de-screen” the image, blurring it slightly to avoid a moiré effect.
GIF and JPEG image formats compress the image and actually discard some of the information, causing colour shifts and blurring so don’t use these formats – they may actually print in black and white and won’t give you the results you are after.
When you are scanning, consider the final size your image is going to be used at. Always scan photographs at 300dpi at the size you are going to use them – use your scanning software to help calculate the output resolution.
Scanning photos at more than 300dpi will have very little or no effect on the printed quality and will just increase your file size and the time it takes to complete the scan.
If you are enlarging or reducing scanned images it is always best to use an image editing application such as Photoshop, rather than your drawing/vector software (e.g. Illustrator).
Bleed Information:
It is very important that the page size of your document is the same size as the finished, trimmed document size. If your artwork needs to be printed to the very edge of the finished size document, any images, colour etc, need to “bleed” off the edge of the stock by at least 3mm. This bleed will be printed but will then be trimmed off. If the software package you are using will not allow you to set a 3mm bleed then make the page size 3mm bigger in each direction e.g. an 85mm x 55mm business card will have a page size of 91mm x 61mm. Please advise us when ordering what the finished size should be if this is how you have had to set up your document.
If you are sending us more than one item to print e.g. letterheads, compliment slips and business cards, it is best to make each of the page sizes correct e.g. A4 letterhead, 210mmx99mm compliment slip and 85mm x 55mm business card.
Page sizes and dimensions, both with and without bleeds:
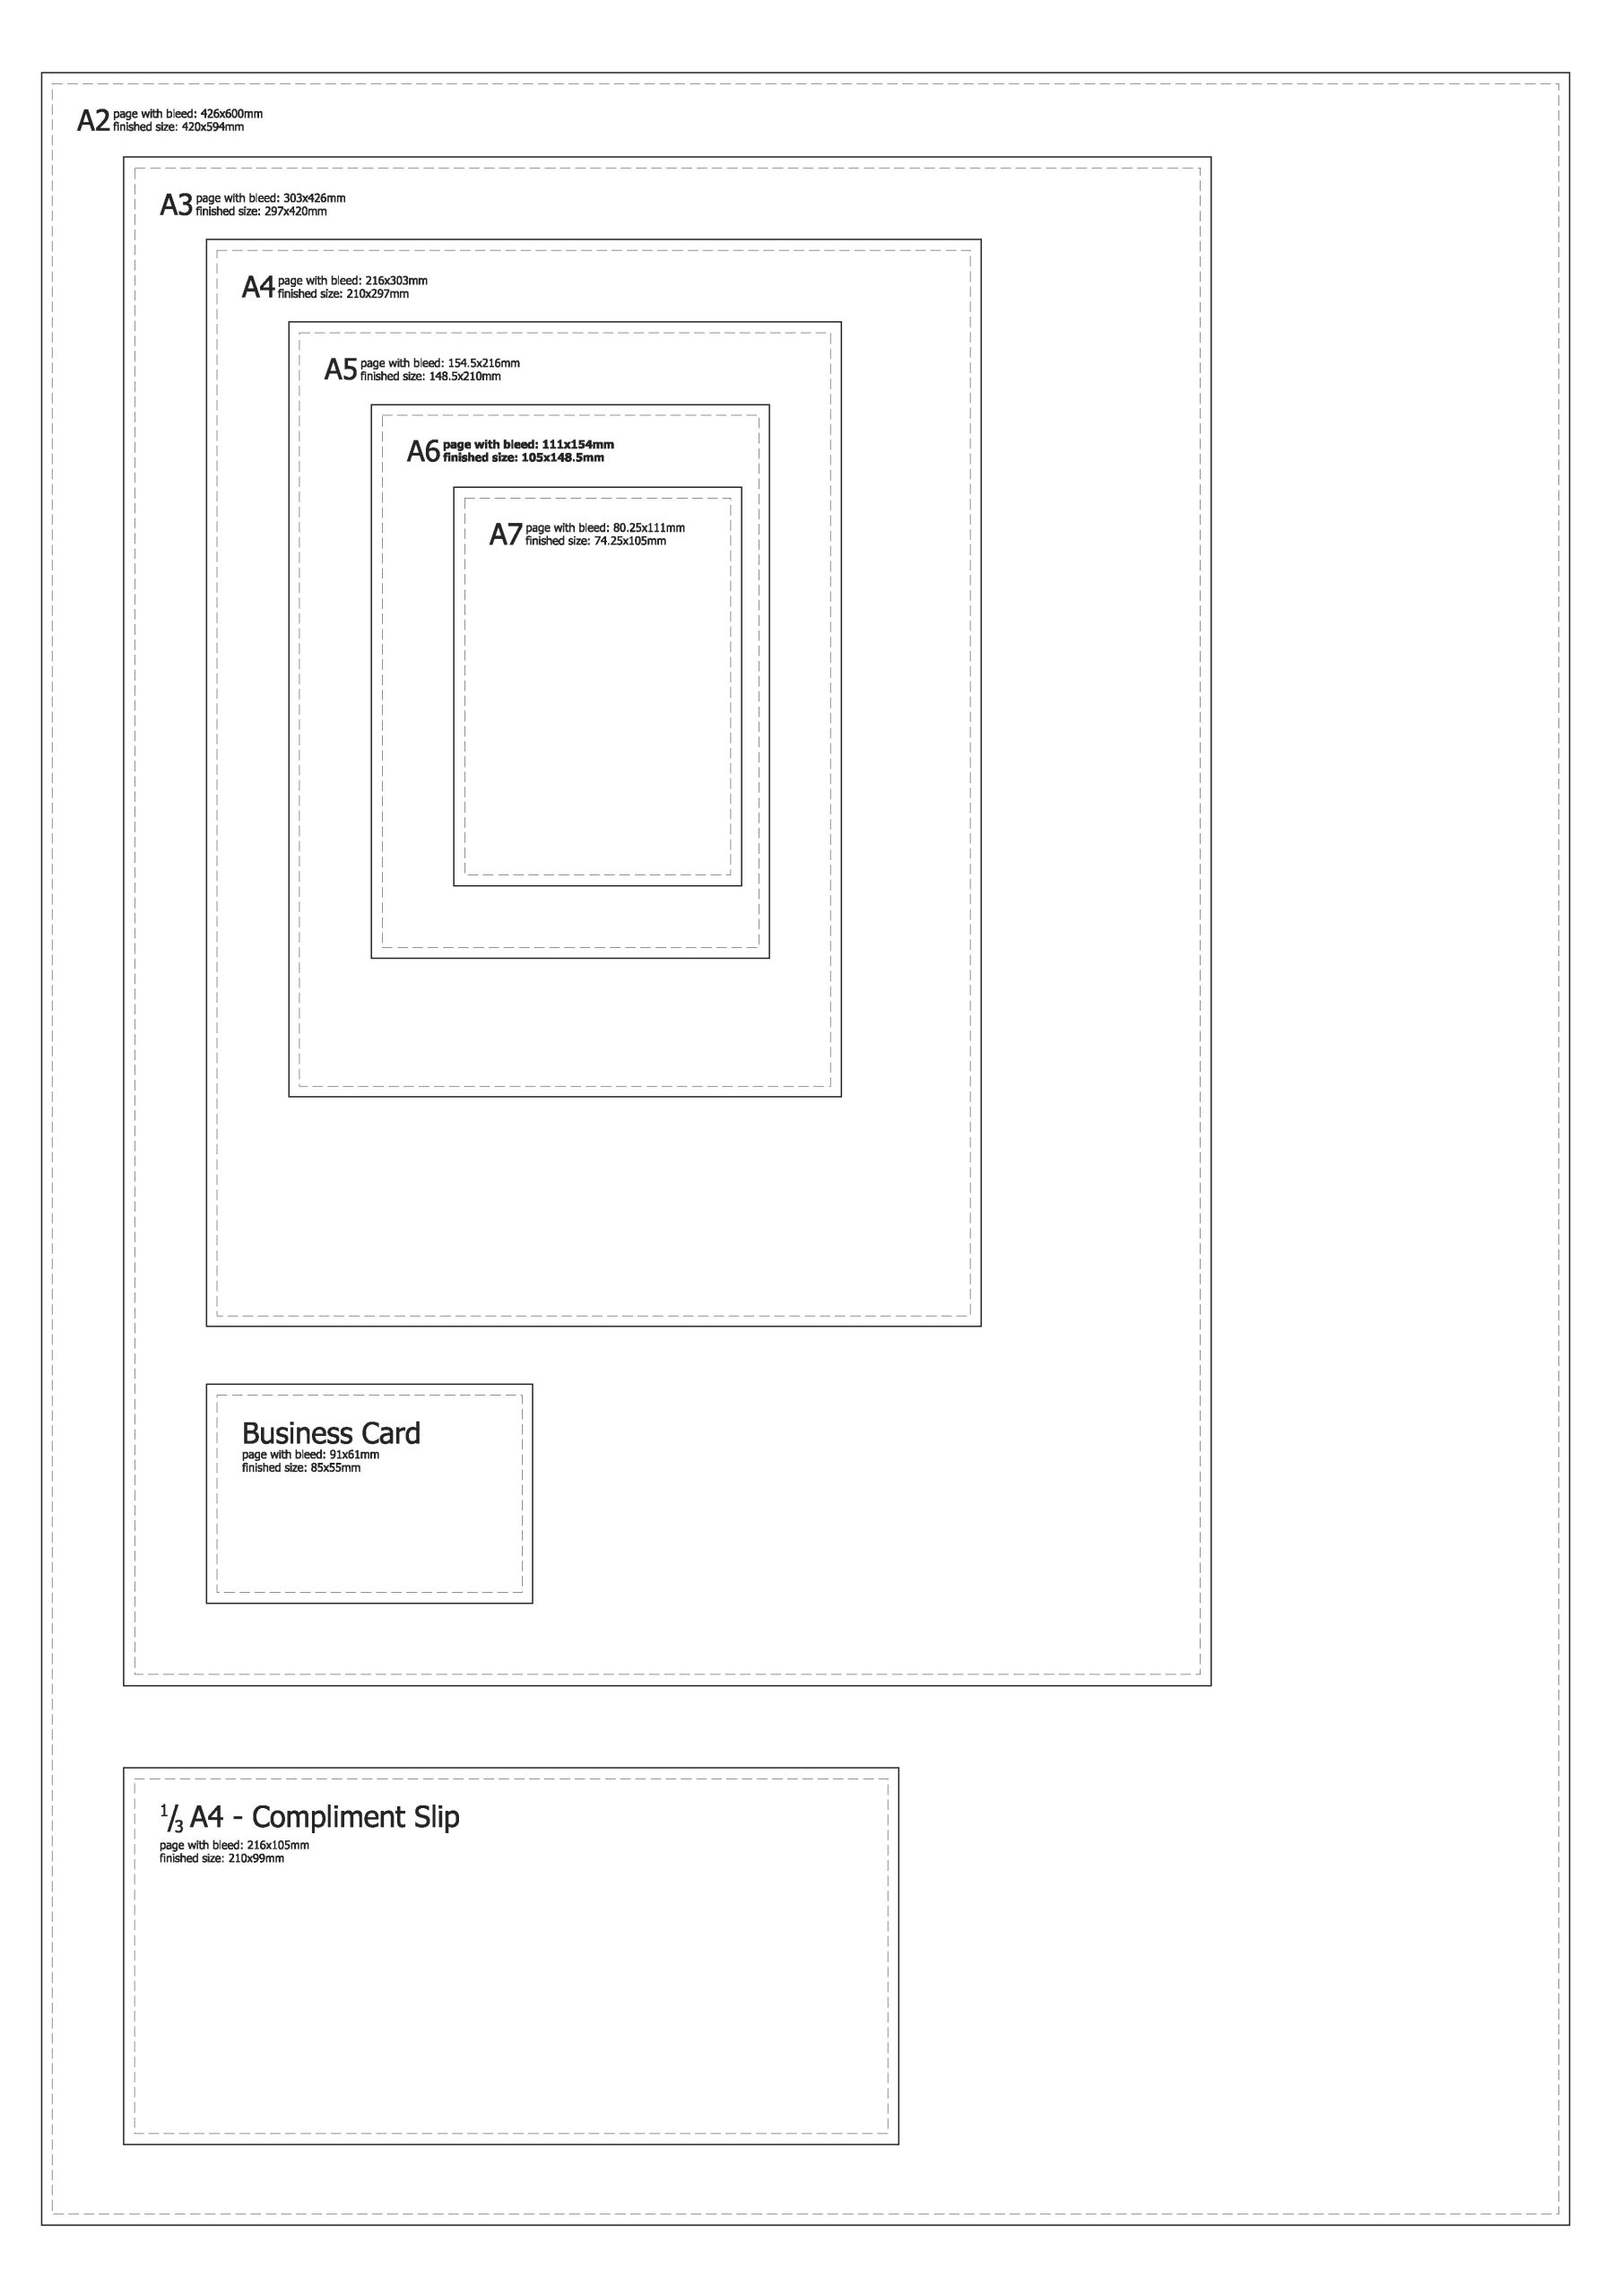
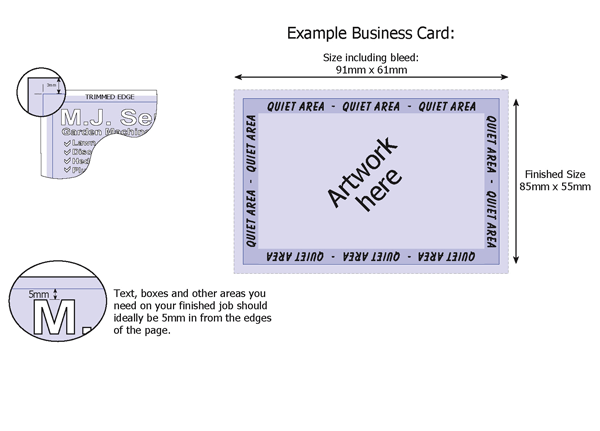
Example: Business Card with 3mm bleed off all edges:
Artwork size = 91mm x 61mm; finished size when trimmed = 85mm x 55mm.
Quiet Area
Text, boxes and other areas you need on your finished job should be 5mm in from the edges of the page.
Images, background colours and fills which are intended to print to the trimmed edge of the page should be extended 3mm beyond the page to give a “bleed” (to allow for tolerances in the cutting process).
Fonts
Please note that we use Apple Macintosh computers for our artwork and when converting from your PC to our Mac fonts sometimes don’t travel well! Therefore all fonts used should be embedded or converted to outlines (InDesign, Illustrator) in your document before sending to us. If using Word please provide any fonts used or save your file as a pdf before sending to us.
Supplying Files
Files can be emailed, or supplied on CD, Memory stick, or linked to FTP sites such as “You Send It”. When providing files by CD or memory stick it would be helpful and avoid any confusion if only the files you need printing are provided.
Proofing
We always submit a proof on all new jobs or amendments (unless you are providing a print ready PDF file). All proofs must be signed off in writing before we can proceed to print. Please check any proofs carefully as it is much easier to make any alterations before we print than afterwards!
Timescales for printing
Please let us know when placing your order if you require the finished job by a certain date.
Collection/Delivery Information
Delivery to your premises or collection from our Markfield premises will be arranged as part of the order process.