
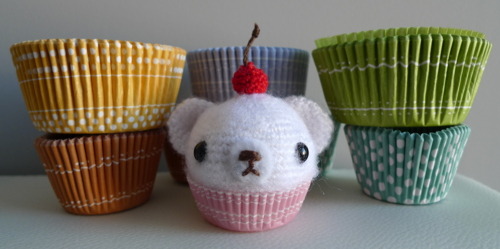
Pattern: Mini Cupcake Bear
Here is the pattern to make a mini cupcake bear!
Materials:
- White yarn (I used Bernat Baby yarn, “Super fine or fingering weight”)
- Brown and red embroidery floss
- 2.00 mm Clover Amour crochet hook
- Yarn needle (bent tip helpful for attaching amigurumi parts- see HERE)
- Fiberfill
- White felt
- 6 mm safety eyes
- Dog slicker brush
- Glue gun
Note: I worked in continuous rounds (vs. joined rounds). Feel free to follow along with my blog post to see step-by-step photos.
HEAD
Using white yarn,
R1: 6 sc in Magic Ring. (6 sts)
R2: 2 sc in each sc around. (12 sts)
R3: *Sc 1, 2 sc in next sc*, rep 6 times. (18 sts)
R4: *Sc 2, 2 sc in next sc*, rep 6 times. (24 sts)
R5: *Sc 3, 2 sc in next sc*, rep 6 times (30 sts)
R6: *Sc 4, 2 sc in next sc*, rep 6 times (36 sts)
R7: *Sc 5, 2 sc in next sc*, rep 6 times (42 sts)
R8: *Sc 6, 2 sc in next sc*, rep 6 times (48 sts)
R9-15: Sc 48
R16: *Sc 6, dec 1*, rep 6 times (42 sts)
R17: *Sc 5, dec 1*, rep 6 times (36 sts)
R18: *Sc 4, dec 1*, rep 6 times (30 sts)
R19: *Sc 3, dec 1* rep 6 times (24 sts)
Using dog slicker brush, begin brushing the yarn (see Roxycraft’s tutorial on brushing technique). Place 6 mm safety eyes and begin stuffing head.
R20: *Sc 2, dec 1*, rep 6 times. (18 sts)
R21: Sc 18
Continue stuffing head firmly.
R22: *Sc 1, dec 1*, rep 6 times. (12 sts)
R23: *Dec 1*, rep 6 times. (6 sts)
Fasten off and weave in end.
Brush bottom half of head using dog slicker brush.
EARS (make 2)
Using white yarn,
R1: 6 sc in Magic Ring. (6 sts)
R2: 2 sc in each sc around. (12 sts)
R3: *Sc 1, 2 sc in next sc*, rep 6 times. (18 sts)
R4-5: Sc 18.
Fasten off and leave long end for sewing. Sew open end together. Brush yarn using dog slicker brush. Sew ontop of head.
CHERRY
Using red embroidery floss,
R1: 6 sc in Magic Ring. (6 sts)
R2: 2 sc in each sc around. (12 sts)
R3-4: Sc 12
Stuff cherry gently.
R5: *Dec 1*, rep 6 times. (6 sts)
Fasten off and hide ends. Loop brown embroidery floss through a stitch on the top. Knot ends together and snip off. Sew or glue cherry onto head.
Adding details:
Cut out circular piece of white felt and sew nose onto felt with brown embroidery floss. Attach felt nose to face by sewing or using a glue gun.
Place mini cupcake bear in cupcake liner. Cut the cupcake liner to an appropriate size if needed (if it is too big, then the face will be covered). Put stuffing on bottom of cupcake liner if you want the bear to be slightly raised. Squeeze glue along the inside of the cupcake liner. Place mini cupcake bear inside and press firmly.
And there you have it! A pattern to combine two of my loves: cupcakes and teddy bears!
This pattern is an original pattern by Stephanie Lau of All About Ami (March 2011). Please do not claim this pattern as your own. If you wish to share this pattern, you may link to this pattern but please do not reprint it on your site. You may keep a copy for your own personal use but please DO NOT sell the pattern or distribute it.
You may sell products made from this pattern but please clearly credit the design to me, Stephanie Lau of All About Ami, and provide a link to my blog www.AllAboutAmi.com. Permission is NOT granted for mass production or factory manufacturing of any kind. Thank you for being respectful and for your understanding!


